CacheFly Smart Image Optimization (4.3.0)
Download OpenAPI specification:
This documentation provides details on CacheFly Smart Image Optimization service version 4.
CacheFly Smart Image Optimization is a fast, secure image processing service that allows you to transform and optimize your images on the fly. Large, uncompressed images can significantly slow down your website, resulting in a poor user experience and lower search engine rankings.
CacheFly uses the fastest and most efficient image processing libraries, typically 4-8x faster than the alternatives. To reduce both latency and cost all image processing is run on our edge compute servers, and protected by our global CDN.
Once Smart Image Optimization is enabled for your account, you will have the option of creating a configuration file. This configuration is then associated with your services. This gives you full self service control over when and how the image processing is applied.
Once Smart Image Optimization is enabled for your account, there are several ways to configure the service.
- The Visual Editor in the Portal
- The Code Editor in the Portal
- The API version 2.5 or later
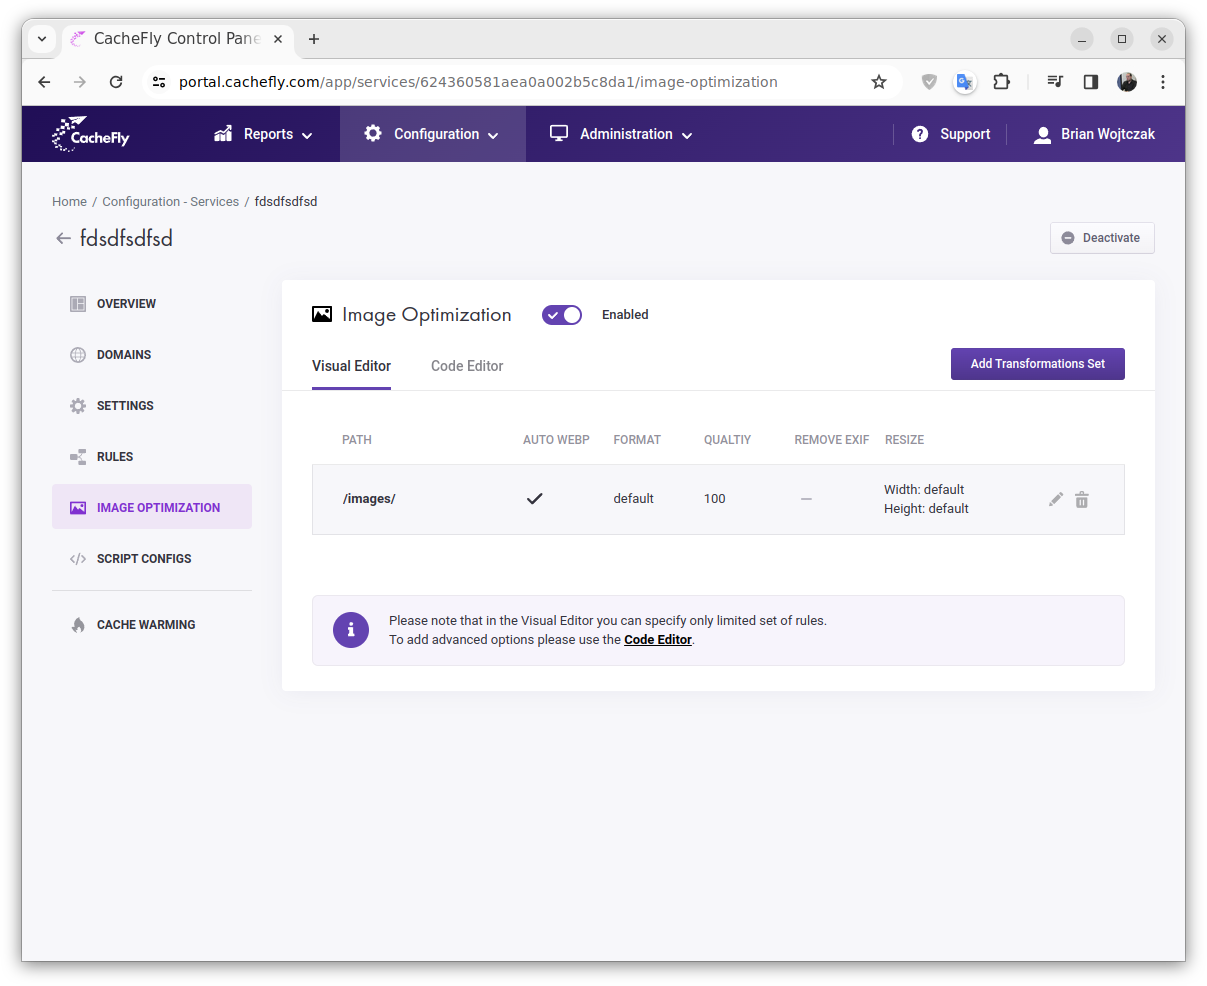
In the Portal you will find an Image Optimization option in the side menu for each service. If it is not present please contact our Sales team. On accessing this section you will see the Visual Editor.
The Visual Editor is designed to provide an easy way to configure the most commonly used features of the Image Optimization service.
With this editor you can create Predefined Transforms which use the following features:
Auto WebP
The Auto WebP will automatically convert images to the WebP format if the client supports it.
Image Format Conversion
This feature allows you always to convert the image in to the specified format. The default option indicates that the format should not be changed.
Supported formats: jpeg, png, gif, webp, tiff, jp2
Changing Image Quality
This feature changes the overall quality of the image (for some formats).
Removing Exif metadata
This feature removes Exif metadata from the resulting image.
Resizing
This feature resizes the image. If either dimension is zero the image will be resized to maintain the aspect ratio of the original image.
To use any of the features not supported in the Visual Editor, including Dynamic Transforms you will need to configure them via the Code Editor.
The following screenshot shows the Visual Editor with a predefined transformation set already configured.
Next to the Visual Editor you will find the Code Editor. This allows you to configure the service using a configuration file. The format of this configuration is described in the remainder of this document.
The editor within our Portal is based on the well known Visual Studio Code editor, and will show various warnings and errors as you type. You should ensure that all of these are addressed before saving the configuration.
Please note that our Portal is intended to be useful and convenient. It is not intended to be comparable to a fully featured integrated development environment (IDE).
If you are modifying the configuration regularly you may wish to use a third party IDE. We recommend IntelliJ IDEA Community Edition, which is free and open source, but there are many other options are available.
The configuration is written in YAML. YAML is intended to be more human friendly than JSON. It is reasonably easy to follow (without any experience), but sometimes writing it takes a little getting used to. The main advantages of YAML are the lack of curly braces, the use of indentation to define the structure, and the ability to add comments.
If you are not familiar with YAML, there are many great resources online to help you get started.
Additionally our team has found the following tools useful;
- https://www.jetbrains.com/idea/ - IntelliJ IDEA Community Edition IDE
- https://vscode.dev/ - Visual Studio Code in the browser
- https://www.yamllint.com/
- https://onlineyamltools.com/
If you require any support with authoring or modifying your configuration, please contact our support team who will be very happy to assist.
If you would prefer to use JSON, please contact our support team who will be happy to switch your service to JSON mode.
We recommend that you:
- Keep backups of your configuration on your own systems
- Consider testing the configuration using a CacheFly service which is not serving your production traffic
- Ensure that you are fully confident in the configuration before you save it
It is possible for us to revert to a previous configuration if you have a problem. However this is a manual process and will take some time to complete.
The configuration can also be managed via the API.
The body of the API requests is the same as the configuration which you use in the Code Editor. Please see above for more information.
The details of the API endpoints is left to API documentation, as they can vary depending on the version of the API that you are using. Please ensure that you check the documentation for the version of the API that you are using.
The API documentation is available at; https://api.cachefly.com/api/2.5/docs
If you require any assistance with the API please contact our support team.
Note that version 4 of the Smart Image Optimization service is fully backwards compatible with previous versions. As all previous versions are fully configured by our support team, you will need to contact us to upgrade. Upgrading will give you access to the new features described in this document, in addition to the existing features which you are already using.
Note it may be easier to start from scratch with a new service, and transition your traffic to the new service over time. This can be accomplished through the Portal after having Smart Image Optimization enabled on your account.
Please contact Sales if you would like to upgrade.
The image optimization functionality is split into three categories:
-
Advanced Features operate autonomously from the core image manipulation engine, harnessing the power of specialized alternative engines for executing specific tasks, such as Auto Gamma Correction. These features offer the dual advantage of refining CDN behavior and optimizing interactions with clients requesting images, thus providing a sophisticated layer of customization and efficiency.
-
Image Operations define the size and alignment of images. This category provides precise control over image presentation, ensuring that each image is displayed exactly as intended, enhancing both aesthetic appeal and functional alignment within your digital content.
-
Image Filters are applied subsequent to Image Operations and serve to adjust the image's aesthetic properties without altering its visible dimensions. From subtle enhancements to dramatic effects, these filters provide the tools to fine-tune the visual impact of your images, ensuring that each one contributes effectively to your overall design narrative.
These can be invoked through two different methods:
-
Dynamic transforms offer the highest level of flexibility for real-time image processing and content adjustment through a familiar URL syntax, requiring your application to define transformations, ideal for dynamic scenarios but more complex to integrate than predefined methods, with an emphasis on security through URL signing features.
-
Predefined transforms provide simplifies consistent image processing by allowing the definition of uniform transformations in the configuration, which are triggered via specific paths for a library of images.
Dynamic transforms are the most flexible. With this method your application or website is responsible for determining what transformations are required. This allows you to determine exactly what image processing you want at run time, making it ideal for dynamic content and dynamic image processing.
Dynamic Transforms are defined in a URL syntax inspired by other similar services, such that it should be familiar to you if you have previously used a similar service. The URL syntax is described in full below.
This is more complicated to integrate than the Predefined method, as with this method most of the decisions are made by your application (rather than the CDN).
The steps for using the dynamic transforms are:
- Generate the URL for the transformation you want
- Prepend the path you have configured for the dynamic transforms
Note when using this method you should also configure one of the URL Signing features for your service, such as ProtectServe.
The URL syntax is inspired by other similar services, such that it should be familiar to you if you have previously used a similar service.
The URL syntax is as follows:
/<<PREFIX>>/<<FEATURES>>/<<OPERATIONS>>/filters:<<FILTERS>>/<<IMAGE>>
<<PREFIX>>/The prefix is the path you have configured for dynamic transforms.
<<FEATURES>>/These are the Advanced Features that you want enabled for this transformation. This is optional and can be omitted if you do not want to apply any image processing operations.
Operations are delimited by a
:character. They must be specified in the same order which are described in this document (below). The operations can not be reordered or repeated.<<OPERATIONS>>/The operations are the image processing operations you want to apply to the image. This is optional and can be omitted if you do not want to apply any image processing operations.
Operations are delimited by a
:character. They must be specified in the same order which are described in this document (below). The operations can not be reordered or repeated.filters:<<FILTERS>>/The filters are the image processing filters you want to apply to the image. This is optional and can be omitted if you do not want to apply any image processing filters.
The filters section is prefixed by the
filters:keyword. The filters are delimited by a:character. Each filter is styled like a function call, with the name of the filter as the function name and the parameters as the function arguments. The parameters are delimited by a,character.Example:
filters:fill(yellow):round_corner(40,60,green)/<<IMAGE>>The image is the URL of the image you want to process. This is required. It must start with either HTTP or HTTPS.
For best performance, we recommend storing the original images in our S3 compatible Object Storage service.
Sometimes it is useful to query the metadata of an image. This is often used for troubleshooting but may also be incorporated in to your application, if you require.
Additionally this metadata can be extracted from the image and used during the Interpolation stage for predefined transforms.
Dynamic Transforms support exposing this to you if you specify the keyword meta instead of any operations or
filters.
Therefore, the URL syntax is as follows:
/<<PREFIX>>/meta/<<IMAGE>>
<<PREFIX>>/The prefix is the path you have configured for dynamic transforms.
<<IMAGE>>The image is the URL of the image you want to process. This is required. It must start with either HTTP or HTTPS.
For best performance, we recommend storing the original images in our S3 compatible Object Storage service.
Example:
https://example.cachefly.net/images/meta/https://images.unsplash.com/photo-1523712999610-f77fbcfc3843
Which at the time of writing returns:
{
  "format": "jpeg",
  "content_type": "image/jpeg",
  "width": 4368,
  "height": 2912,
  "orientation": 1,
  "pages": 1,
  "bands": 3,
  "exif": {
    "ApertureValue": "6918863/1000000",
    "ColorSpace": 1,
    "Compression": 6,
    "DateTime": "2018:04:06 12:46:19",
    "DateTimeDigitized": "2014:03:07 09:00:59",
    "DateTimeOriginal": "2014:03:07 09:00:59",
    "ExifVersion": "Exif Version 2.21",
    "ExposureBiasValue": "0/1",
    "ExposureMode": 0,
    "ExposureProgram": 3,
    "ExposureTime": "1/25",
    "FNumber": "11/1",
    "Flash": 16,
    "FocalLength": "32/1",
    "ISOSpeedRatings": 100,
    "Make": "Canon",
    "MeteringMode": 5,
    "Model": "Canon EOS 5D",
    "Orientation": 1,
    "PixelXDimension": 4368,
    "PixelYDimension": 2912,
    "ResolutionUnit": 2,
    "SceneCaptureType": 0,
    "ShutterSpeedValue": "4643856/1000000",
    "Software": "Adobe Photoshop CC",
    "WhiteBalance": 0,
    "XResolution": "3000000/10000",
    "YResolution": "3000000/10000"
  }
}
Credit: Image by Johannes Plenio
Predefined Transforms allow you to define a set of transformations that can be applied to your images. This is ideal for when you have a library of images which all require the same processing.
Predefined transformations are specified in the predefined property of the configuration. You can access the
transformation at the appropriate path. You can specify as many as you wish.
Example:
predefined:
  - path: "/xyz/"
    operations:
      - 500x0  # width 500, height auto
    filters:
      - fill(yellow)
      - round_corner(40,60,green)
      - format(jpeg)
    image: "https://images.unsplash.com/{{$FILE}}"
The above configuration would then be used by visiting a URL such as:
https://example.cachefly.net/xyz/photo-1523712999610-f77fbcfc3843
It would fetch and apply the transformation to the image found at:
https://images.unsplash.com/photo-1523712999610-f77fbcfc3843
See the below sections on Interpolation and Variables for more details on how this example works.
The predefined property is an list of predefined transformations. Each transformation is specified as a map
with the following properties:
path(string)The
pathproperty is the path prefix that you want to use to access the transformation. This is required. The specified path must be unique. If you specify multiple transformations with the same path, one of them will be picked at random.The path is case sensitive. The path must start with a
/character, and should end with a/character.Example:
/images/By specifying query parameters in the path you are requiring that they be present in the request for us to apply this specific transformation.
For example
/images/?thumbnailcould be used to specify a transformation with a lower resolution and quality is used when a query parameter namedthumbnailis present.Note that for matching purposes the value of the parameter is not considered, only the presence of the parameter. See the Interpolation section for details on how to use query parameter values.
Example:
/images/?thumbnailPaths are considered in longest to shortest order, and the first matching path is used. Hence more specific paths will be matched before less specific paths. You may add padding using one or more
#characters to affect the order of matching.features(list)The
featuresproperty specifies which features you want to enable. This is optional.See below Advanced Features section for a complete description.
operations(list)The
operationsproperty specifies which image processing operations you want to apply. This is optional.See below Image Operations section for a complete description.
filters(list)The
filtersproperty specifies which image processing filters you want to apply. This is optional.Note that unlike the above described URL syntax, there is no
filters:keyword. You simply specify the filters as an list of strings, with each element in the list being a single filter. Please refer to the above example.See below Image Filters section for a complete description.
filters-landscape(list)The
filters-landscapeproperty specifies which image processing filters which apply only when the original image is wider than it is tall. If defined alongsidefiltersthe order within the configuration is respected.filters-portrait(list)The
filters-portraitproperty specifies which image processing filters which apply only when the original image is taller than it is wide. If defined alongsidefiltersthe order within the configuration is respected.ttl(integer)The
ttlproperty specifies how long the CDN should cache the image. This is specified in seconds. This is optional.Ideally you wish to have the image cached for as long as possible to provide the best possible user experience. We recommend a TTL of 31536000 seconds (365 days) for images which are not expected to change.
See below TTL section for more details.
resize(map)The
resizeproperty allows you to resize the image after the operations and filters are applied. This is optional.See below Resize section for more details.
image(string)The image is the URL of the image you want to process. This is required. It must start with either HTTP or HTTPS.
Example:
https://images.pexels.com/photos/15688735/pexels-photo-15688735.jpegFor best performance, we recommend storing the original images in our S3 compatible Object Storage service.
variables(map)The variables property allows you to define variables which are unique to this transformation.
See the below sections on Interpolation and Variables for more details.
The ttl property for a predefined transform specifies how long the CDN should cache the image. This is specified
in seconds.
Ideally you wish to have the image cached for as long as possible to provide the best possible user experience.
This defaults to 31536000 seconds (365 days). If you have a reverse proxy configured for your service through Service Options, the value you have specified there will be as the default instead.
Specifying a value here will override both of the defaults described above.
Once the TTL has expired, the processed version of the image will no longer be available in the cache. The next time the image is requested, the CDN will forward the request to the image processing logic. This will result in the CDN fetching the original image from the origin server again.
Note that the TTL is a maximum (not a minimum). If you have fully utilised your dedicated cache storage, cached images which are not accessed frequently may be dropped from the cache before the TTL has expired.
Example:
predefined:
  - path: "/xyz/"
    ttl: 86400 # only cache the image for 1 day
Negative and extremely short TTLs
Setting a negative or extremely short TTL will have a negative impact on performance as images are cached and then expired in a very short period of time. We advise against TTLs lower than 3600 seconds (1 hour).
If you require that your images are not cached by the CDN you should enable the Disable CDN Caching feature. That features bypasses the cache without unnecessarily burdening it (in the way that a low TTL would do).
Caching of images with multiple variations
When there are multiple variations of the same image (i.e. both JPEG and WEBP), the caching and TTL is applied to each variation independently.
Managing previously cached images
Changing this TTL will not change the lifespan of images which are already cached. This is because the TTL is only referenced when the image is placed in to the cache.
Images which are already in the cache may be purged from the cache at any time. After doing so the CDN will behave as if the TTL has expired.
Please refer to the Service Purge documentation for more instructions on how to do this via the API. It is also possible to issue purge requests via the Portal.
The resize property for a predefined transform allows you to resize the image after the operations and filters
are applied. This differs from specifying the image/canvas size via Image Operations,
as the operations start at the beginning of the image generation, and this resize occurs after the generation is
complete.
This allows you to apply watermarks, add labels, and perform other operations on the image at the original size, and then resize/scale the resulting modified image.
The resize property is a map with the following properties:
size(string)The
sizeproperty specifies the required size of the image. It is formatted as two integers separated by anx. The first integer is the width, and the second integer is the height.Example:
1280x720If either of the integers is zero, that dimension will be calculated automatically to maintain the aspect ratio of the original image. If both are zero, the image will not be resized.
If the specified size has a different aspect ratio than the original image, the image will be stretched to fit.
max(string)The
maxproperty specifies the maximum allowed size of the image. This is useful for preventing resizes of an image to an excessively large size when the parameters are set dynamically through Interpolation. It is formatted as two integers separated by anx. The first integer is the width, and the second integer is the height.Example:
1280x720If either of the integers is zero, no maximum will be applied to that dimension. If both are zero, then no maximum will be applied to the resize functionality.
Alternatively the resize property may also be specified as a string with the same format as the size property.
In this case no maximum can be applied.
Example:
predefined:
  - path: "/xyz/"
    features:
      # Replace default with auto when only one dimension is provided
      - "query-width-height-auto-ratio"
    operations:
      # Work on the image at this resolution (ratio 2:3)
      - 1478x2218
    filters:
      - fill(yellow)
      - round_corner(40,60,green)
      - format(jpeg)
    resize:
      # resize after filters based on query parameters
      size: "{{?WIDTH:389}}x{{?HEIGHT:0}}"
      # maximum size permitted for resize feature (ratio 2:3)
      max: 739x1108
    image: https://images.pexels.com/photos/15688735/pexels-photo-15688735.jpeg
See below documentation on Query WxH Auto Ratio for details on the
query-width-height-auto-ratio feature.
See the below sections on Interpolation and Variables for more details on the query parameters syntax.
Interpolation allows predefined transformations to combine information from dynamic sources with static config. This functionality is what allows a single predefined transformation to be used for multiple images.
There are two independent interpolation passes performed for each transformation. Each pass has access to a different set of data and is used for different purposes.
Stage 0 (pre-cache)
Initial interpolation is performed before the cache key is determined, and influences how the image is cached. During this pass you have access to details about the request, and the configuration, but not the image itself. You can use any of the static variables specified within your configuration, and any of the dynamic variables which are injected by the CDN.
This pass is performance critical as it is executed for all requests (even those which are cached). As such the syntax is very limited. The variable names are case insensitive, and whitespace is not permitted.
The syntax is:
{{$VARIABLE}}Replace this token with the value from the named variable; the name is
VARIABLEin this example. For a variable namedFOOthe token would be{{$FOO}}.See the Variables section for a list of available dynamic variables.
{{$VARIABLE:DEFAULT}}As above, but use the given default if the name variable is absent or equivalent to empty.
{{?VARIABLE}}Replace this token with the value from the named query parameter.
All of the query parameters present on the request are available for interpolation (case insensitive).
{{?VARIABLE:DEFAULT}}As above, but use the given default if the named query parameter is absent or equivalent to empty.
The functionality of this pass can be modified/extended by the use of Features.
Example:
predefined:
  - path: "/xyz/"

    # Within this URL the token ${{FILE}} is replaced with the value of
    # the dynamic variable named FILE (injected by the CDN). This value
    # is calculated to be the name of the file based on the path in the
    # request.
    # e.g. /xyz/image1233.jpg          = image1233.jpg
    #      /xyz/abc/def/image1233.jpg  = image1233.jpg
    #      /xyz/foobar/image1233.jpg   = image1233.jpg
    #      etc.
    #
    # so "https://images.unsplash.com/{{$FILE}}"
    #  = "https://images.unsplash.com/image1233.jpg"
    #
    image: "https://images.unsplash.com/{{$FILE}}"
In this example;
- The URL for the image is constructed from some static text and a dynamic variable
- The dynamic variable contains the name of the file from the path in the request to the CDN
Stage 1 (post-cache)
Final interpolation is unable to affect the cache key, but has full access to the image metadata, and has the ability to perform basic arithmetic and string manipulation. The result of this pass is stored in cache, and so the intention is for all complex interpolation to be deferred to this pass.
For this pass the all names are case sensitive, and whitespace is used as part of the syntax. Leading and trailing whitespace is ignored.
The following syntax is sufficient for most use cases:
{{ .variable }}Replace this token with the value from the named variable. The variable name is case sensitive.
The available variables depends on the metadata extracted from the image, which depends on the image itself. See the Image Metadata section to learn how to view the metadata for an image.
It is usually safe to assume that the following variables will be available:
.width- Width of the image.height- Height of the image.format- Original format of the image (e.g.jpeg,png,webp).exif- exif data (if present in the image; e.g..exif.ExifVersion,.exif.Copyright, etc.)
{{ func arg1 arg2 }}Replace this token with the result of the given function. The function name is case sensitive, and the arguments are separated by spaces. The arguments may be either strings or numbers. There may be any number of arguments, and you must always specify all of the arguments.
Note that only spaces are utilised as argument separators, and commas are not a part of the syntax.
See the Functions section for a list of available functions.
{{ funcA (funcB arg1) }}Parentheses may be used to group expressions, which allows you to pass the result of one function as an argument to another function.
{{ "this string contains spaces" }}Strings may be specified using double quotes. The double quotes are not part of the string, and may be omitted if the string does not contain any spaces. Double quotes may be escaped as
\".
More advanced use is possible as the expressions are evaluated using the Go template language. Please refer to the third party documentation for information on actions/control structures, pipelines, transient variables, and other advanced features which are beyond the scope of this document.
Example:
predefined:
  - path: "/xyz/"
    operations:
      - stretch
      - {{add .width 100}}x{{add .height 100}} # add 100px in both dimensions
    filters:
      # .exif.Model = "Canon EOS 5D Mark III"
      # .exif.Make = "Canon"
      #  so {{ trim (replace .exif.Model .exif.Make "") }} = "EOS 5D Mark III"
      - label({{ trim (replace .exif.Model .exif.Make "") }},20,20,40,white)
    image: "https://images.unsplash.com/{{$FILE}}"
In this example;
- the width and height of the original image are accessed and then manipulated using the
addfunction - the exif data is accessed to create a label for the image
- the
replacefunction is used to remove the make of the camera from the string which describes the model of the camera - the result of the
replacefunction is passed to thetrimfunction to remove any leading or trailing whitespace
The following interpolation functions are available (in the final pass):
addtakes two argumentsnumber numberand returnsnumberAdd two numbers together.
Example:
add .width 10returns the width of the image plus 10.subtracttakes two argumentsnumber numberand returnsnumberSubtract the second number from the first.
lowertakes one argumentstringand returnsstringConvert a string to lower case.
uppertakes one argumentstringand returnsstringConvert a string to upper case.
trimtakes one argumentstringand returnsstringRemove leading and trailing whitespace from a string.
replacetakes three argumentsstring string stringand returnsstringReplace all occurrences of the first string with the second string within the third string.
Example:
replace "foo" "bar" "foo baz foo"returnsbar baz barnumbertakes one argumentstringand returnsnumberConvert a string to a number. If the string is not a valid number, the function will return zero.
itoatakes one argumentnumberand returnsstringConvert a number to a string. Note that strings and numbers are duck typed, so this function is not strictly necessary in most scenarios.
querytakes one argumentstringand returnsstringEncodes the given string using the percent encoding scheme as used by URL query strings. You should use this function to encode any string which you believe may contain any non-alphanumeric characters (especially any character reserved by RFC 3986 section 2.2).
Additionally the standard set of functions provided by the Go template language (and, not,
or, len, eq, ne, lt, le, gt, ge, print, printf, etc.) are available but not
documented here as we don't foresee them being used in this context. Please refer to the
Go template language documentation if you
require further details on their operation.
Static Variables
Variables can be statically configured in each Predefined transformation, and within the config as a whole.
Example:
predefined:
  - path: "/xyz/"
    variables: # Variables which are only available to this transform
      FOO: "value"

variables: # Variables which are available to all transforms
  NAME1: "value1"
  NAME2: "value2"
  NAME3: "value3"
Variables defined within the transform will override any variables with the same name which are defined in the config as a whole. As we always use the most specific value available.
Dynamic Variables
Some variables are dynamically generated and injected by the CDN. These will usually override any static variables which have the same name.
The following dynamic variables are available:
PATHThe path of the request. This will be the path of the request as it was received by the CDN.
PATHZThe path of the request, with the matched prefix removed. e.g. If the request was for
/xyz/abc/def.jpgand the transform has the path/xyz/thenPATHZwill beabc/def.jpg.FILEThe filename of the request. e.g. If the request was for
/xyz/abc/def.jpgthenFILEwill bedef.jpg.DIRThe directory of the request. This is the path of the request with the filename removed. e.g. If the request was for
/xyz/abc/def.jpgthenDIRwill be/xyz/abc/.ORIGINThe URL for the reverse proxy origin which you have configured for your service via Service Options. This will start with either
http://orhttps://(depending on the reverse proxy configuration).PROTOCOLThe protocol used to access the CDN. This will be either
httporhttps.IPThe IP address of the client which made the request to the CDN. Note this could be in either IPv4 (
192.168.123.146) or IPv6 (2001:0db8:85a3:0000:0000:8a2e:0370:7334) format. If you use this variable you should ensure that you can accommodate both formats.TTLThe configured/calculated TTL for this image. See the TTL section above.
UIDA CacheFly short unique identifier for your service. Will be the same for every request. Internally this is used for billing, auditing, and abuse prevention.
Custom Dynamic Variables
This documentation only covers the generic dynamic variables which are available to all users.
Our system allows us to hook in additional logic for specific accounts which will generate additional dynamic variables. There are usable in the same way as those described above. If this has been done for your account already please refer to the documentation we provided you during the setup process (or ask our support team to resend it).
If you have a use case which is not covered by the functionality documented here, please contact us to discuss possible solutions.
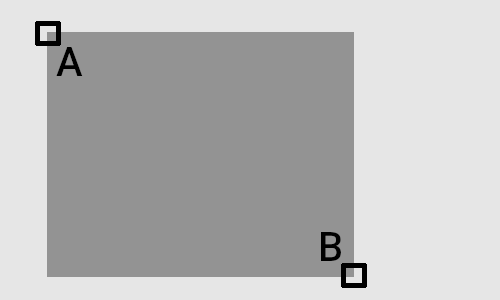
The image cropping and resizing process follows several systematic steps to ensure that the final image maintains its aspect ratio and matches the desired dimensions:
Aspect Ratio Calculation
The process begins by calculating the aspect ratio of both the original image and the desired output dimensions to identify if there's a mismatch.
Determination of Cropping Axis
Based on the aspect ratio comparison, it's determined whether the image requires horizontal or vertical cropping to match the desired aspect ratio. Cropping is only done in one direction to preserve as much of the image as possible without altering its intrinsic proportions.
You can use the Image Operations to specify the axis for cropping.
Proportional Cropping
After deciding on the axis for cropping, the specific amount to crop is calculated to ensure the image's new dimensions will have the same aspect ratio as the target size. This step may involve adjusting the height or width of the image to proportionally fit the desired dimensions.
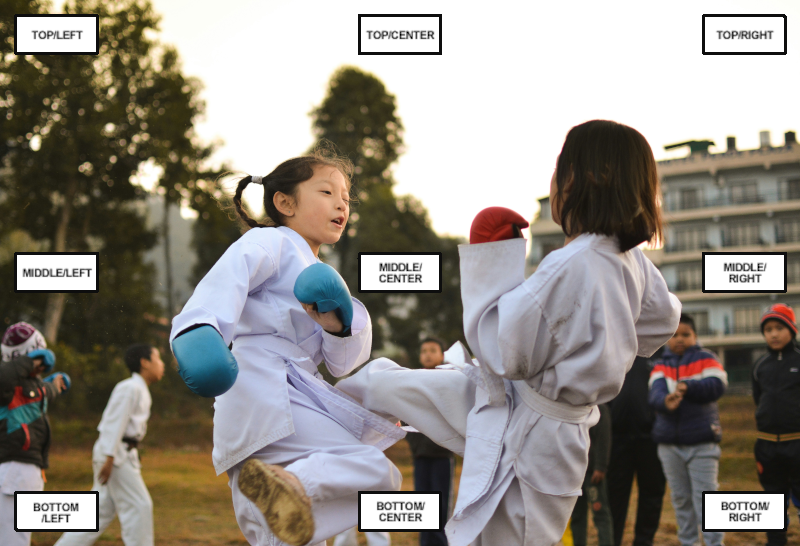
Application of Focal Points or Alignment
To decide exactly where to crop from (top, bottom, left, or right), focal points or image alignment (horizontal and vertical) are used. If focal points are defined, they guide the cropping process to focus on the image's area of interest. In their absence, alignment settings dictate from which sides cropping occurs to achieve a balanced composition.
You can use the Image Operations to specify the focal points or alignment. The Smart Operation uses an algorithm to automatically determine which parts of the image are most interesting and sets the focal point accordingly.
Cropping Execution
The image is then cropped according to the calculated proportions and alignment decisions. This step ensures that the most important parts of the image are preserved and that the cropped image aligns with the desired aspect ratio.
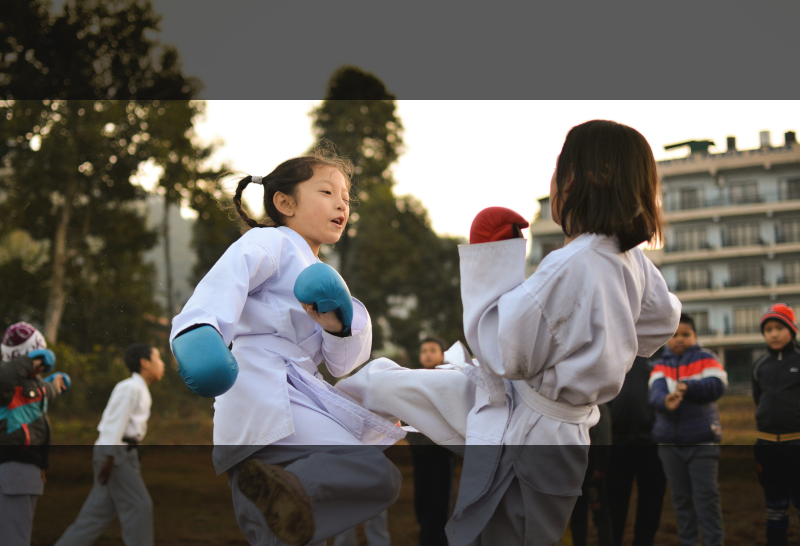
Example cropping height with central focal point
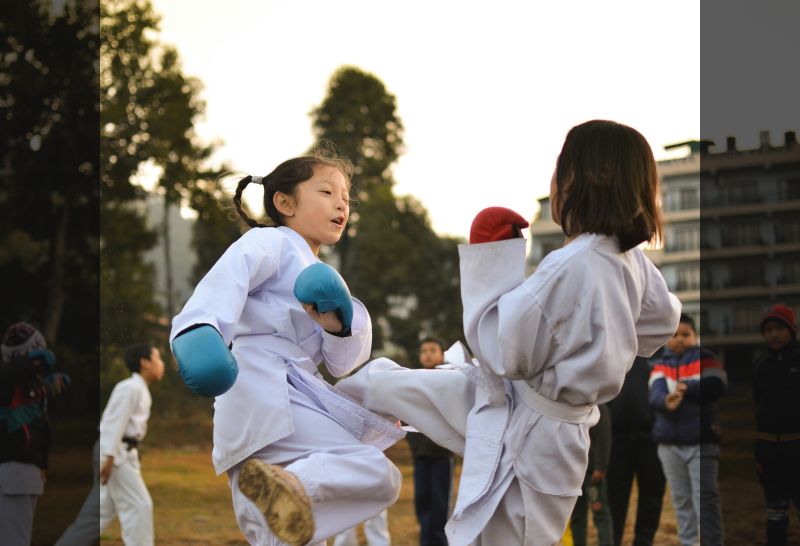
Example cropping width with central focal point
Resizing
Following cropping, the image is resized to the exact target dimensions. This resizing adapts the cropped image to fit the specified size, completing the transformation process.
Optional Flipping
If the target dimensions include negative values, the image undergoes flipping. Negative width triggers a horizontal flip, while negative height results in a vertical flip, adding a final adjustment based on specified requirements.
Throughout this process, the goal is to minimally alter the original image while ensuring it fits precisely into the desired dimensions, maintaining the quality and integrity of the visual content.
Advanced Features operate autonomously from the core image manipulation engine, harnessing the power of specialized alternative engines for executing specific tasks. These features offer the dual advantage of refining CDN behavior and optimizing interactions with clients requesting images, thus providing a sophisticated layer of customization and efficiency.
For Dynamic Transforms features are enabled by placing their name within the first segement of the URL.
For Predefined Transforms features are enabled by placing their name within the features list.
Example:
predefined:
  - path: "/xyz/"
    features: # List of features to enable
      - "auto-webp" # Enable the auto-webp feature
Features can be conditionally enabled through a query parameter. If the specified query parameter is present then the feature will be enabled for that request. This allows you to decide at request time if you want the feature to be used or not. To configure this you must specify the name of the query parameter that you wish to use.
The syntax is:
<<FEATURE-NAME>>=<<QUERY-PARAMETER-NAME>>
<<FEATURE-NAME>>The name of the feature which you want to be conditionally enabled.
<<OPERATIONS>>The name of the query parameter which must be present for the feature to be enabled.
Example:
predefined:
  - path: "/xyz/"
    features:
      - "auto-orient=ROTATE" # Conditionally enable
The auto-jp2k feature will automatically convert images to the JPEG2000 format if the client supports it. Support
is detected through the HTTP Accept header listing the MIME Type image/jp2.
JPEG 2000 (ISO/IEC 15444) is an image format that was developed between 1997 and 2000 with the intention of superseding the original JPEG standard.
At the time of writing the only web browser to support this format is Safari (since 2010). To check the current status of browser support, see the Can I Use JPEG 2000 website.
The auto-webp feature will automatically convert images to the WebP format if the client supports it. Support
is detected through the HTTP Accept header listing the MIME Type image/webp.
WebP is an image format that was developed by Google in 2010 as a means of providing a more efficient and lightweight alternative to existing image formats like JPEG and PNG.
The main advantages of WebP over other image formats are:
Smaller file sizes: WebP images typically have smaller file sizes than comparable JPEG and PNG images, which can help improve website and app performance by reducing load times and bandwidth usage.
Lossy and lossless compression: WebP supports both lossy and lossless compression, which gives designers and developers more flexibility to choose the best compression method for their needs.
Alpha transparency: WebP supports alpha transparency, which allows for complex image transparency and compositing effects, similar to PNG and GIF.
Wide browser support: While not as widely supported as JPEG and PNG, WebP is supported by most modern browsers, including Google Chrome (Jan 2014), Opera (Jan 2014), Mozilla Firefox (Jan 2019), and Microsoft Edge (Jan 2020).
Safari has limited WebP support, see the Can I Use website for details.
Royalty-free and open-source: WebP is an open-source format that is free to use and does not require any licensing fees.
More information is available in the WebP section of the Google Developers website.
At the time of writing this format is supported by all modern web browsers. To check the current status of browser support, see the Can I Use WebP website.
BETA: We use an experimental AVIF encoder which produces great results. Unfortunately as it is still experimental it lacks performance and fails on some source images. This improves with each new version released by our vendor. For the time being we consider this feature to be a work in progress.
The auto-avif feature will automatically convert images to the AVIF format if the client supports it. Support
is detected through the HTTP Accept header listing the MIME Type image/avif.
Due to the slow performance of AVIF encoding, and the potential for it to fail, this feature uses a multi-stage process:
The first request (from an AVIF capable browser) will result in an image which is not in the AVIF format. This is so that we can return an image quickly.
It will have a short TTL (few minutes) to limit how long it is cached.
Simultaneously, we start the AVIF encoding in the background.
Requests received after the AVIF encoding has completed will result the image in the AVIF format.
This will have the configured TTL, or the default of 31536000 seconds (365 days). This is so that the image is cached for as long as possible and thereby avoiding the need to encode it again. This TTL impacts how long the image is cached by both browsers and the CDN.
Note that this process starts again whenever the AVIF image is evicted from the CDN cache. So it is only beneficial for images which are accessed frequently enough for the CDN to keep it in cache.
You can control the format of the image returned in the first stage by specifying a preferred format using Image Filters.
We recommend always specifying a preferred format, and enabling both the auto-webp and auto-avif features at
the same time. This will result in an AVIF image if we have one cached (and the client supports AVIF), or a WebP
image (if the client supports it), or the specified preferred format.
At the time of writing this format is supported by all modern web browsers. To check the current status of browser support, see the Can I Use AVIF website.
The auto-brotli feature will automatically compress images using the Brotli compression algorithm if the client
supports it. Support is detected through the HTTP Accept-Encoding header listing the encoding br.
Browsers only advertise Brotli support over HTTPS (to avoid breaking HTTP proxies which don't follow standards).
Brotli (RFC7932) is a compression algorithm that was developed by Google in 2015 as a means of providing a more efficient alternative to existing compression algorithms like Gzip and Deflate. The Brotli algorithm was designed to be highly efficient for compressing text-based content like HTML, CSS, and JavaScript.
While Brotli can be used to compress image files, it is generally not usually recommended to do so. In the worst case where the compression provides no benefit, your images will be larger due to the extra metadata which is added by the compression process.
However, for certain classes of images adding Brotli compression can provide an additional reduction in file size, at the cost of additional processing overhead. You may wish to experiment with this feature to see if it provides any benefit for your use case. If reducing bandwidth usage is your primary concern (i.e. when targeting clients on lossy long range wireless networks), this feature may be beneficial (depending on the structure of your images).
Compression is applied after the image transform, but before the CDN cache. This means that compression overheard is only incurred for cache misses.
At the time of writing this encoding is supported by all modern web browsers. To check the current status of browser support, see the Can I Use Brotli website.
The auto-gzip feature will automatically compress images using the Gzip compression algorithm if the client
supports it. Support is detected through the HTTP Accept-Encoding header listing the encoding gzip.
Gzip (RFC1952) is a compression algorithm that was developed by Jean-Loup Gailly and Mark Adler in 1992.
Please see the Brotli section above for more context. The same considerations apply to Gzip.
Gzip doesn't perform was well as Brotli, but is more widely supported and is available over both HTTP and HTTPS.
When both the auto-brotli and auto-gzip features are enabled, and both are supported by the client; Brotli
is preferred.
At the time of writing this encoding is supported by all modern web browsers. To check the current status of browser support, see the Can I Use Gzip website.
When specifying the width and height of an image via query parameters, it is often desirable to preserve the aspect ratio of the original image.
The query-width-height-auto-ratio feature kicks in when you specify only one of either width or height via
query parameters. In this case, the missing dimension will be calculated based on the aspect ratio of the original
image. Without this feature the missing dimension will utilise the default provided in the configuration.
Example when feature is enabled:
predefined:
  - path: "/xyz/"
    features:
      - "query-width-height-auto-ratio" # Replace default with auto when only one dimension is provided
    resize:
      size: "{{?WIDTH:800}}x{{?HEIGHT:600}}"
With this configuration you have the following scenarios:
No query parameters are provided: The image will be resized to 800x600 as per the defaults.
Only the
widthquery parameter is provided: The image will be resized to the specified width, and the height will be calculated based on the aspect ratio of the original image.Only the
heightquery parameter is provided: The image will be resized to the specified height, and the width will be calculated based on the aspect ratio of the original image.Both the
widthandheightquery parameters are provided: The image will be resized and stretched to the specified width and height.
Example of default behaviour (when feature is not enabled):
predefined:
  - path: "/xyz/"
    features: {} # No features enabled
    resize:
      size: "{{?WIDTH:800}}x{{?HEIGHT:600}}"
With this configuration you have the following scenarios:
No query parameters are provided: The image will be resized to 800x600 as per the defaults.
Only the
widthquery parameter is provided: The image will be resized and stretched to the specified width, with a height of 600.Only the
heightquery parameter is provided: The image will be resized and stretched to the specified height, with a width of 800.Both the
widthandheightquery parameters are provided: The image will be resized and stretched to the specified width and height.
The disable-cdn-caching feature instructs the CDN to not cache the image and always forward the request to the
image processing logic. This guarantees that the image will not consume any of your dedicated cache storage space.
This is useful for images which include information which changes frequently, such information about the user who is viewing the image (i.e. IP Address, username, timestmap. etc).
This feature should only be used in the rare circumstances that there is a practically no chance that the image will be requested multiple times.
The auto-orient feature will automatically rotate the image based on the EXIF profile setting orientation.
This EXIF profile setting is usually set using a gravity sensor in digital camera, however photos taken directly downward or upward may not have an appropriate value. Also images that have been orientation corrected without reseting this setting, may be corrected again resulting in a incorrect result.
If the EXIF profile was previously stripped, this will do nothing.
This is performed before any other operations are applied to the image.
The auto-gamma feature will automatically adjust the gamma of the image.
This calculates the mean values of an image, then applies a calculated gamma adjustment so that the mean color in the image will get a value of 50%. This means that any solid 'gray' image becomes 50% gray.
This works well for real-life images with little or no extreme dark and light areas, but tend to fail for images with large amounts of bright sky or dark shadows. It also does not work well for diagrams or cartoon like images.
The auto-level feature will automatically fix the color balance within the image, so that details become easier
to see within darker images.
This is an image normalization operator. It finds the exact minimum and maximum color values in the image and then applies a level adjustment to stretch the values to the full range of values.
This is not typically used for real-life images, image scans, or JPEG format images, as a single out-rider pixel can set a bad min/max values for the operation. On the other hand it is the right operator to use for color stretching gradient images being used to generate Color lookup tables, distortion maps, or other mathematically defined images.
The auto-enhance feature attempts to automatically fix an image to be more visually appealing.
BETA: This feature works well enough for the use cases for which it was developed. It is known that some source images do not produce good results using this feature.
Image Operations define the size and alignment of images. These provides precise control over image presentation, ensuring that each image is displayed exactly as intended, enhancing both aesthetic appeal and functional alignment within your digital content.
The following operations are supported:
trim- TrimAxB:CxD- Manual Cropfit-in- Fit-in (to the box specified byExF)stretch- Stretch (to the box specified byExF)-Ex-F- SizeGxH:IxJ- PaddingHALIGN- Horizontal AlignVALIGN- Vertical Alignsmart- Smart
The operations must be specified in the same order which are described in this document.
The operations can not be reordered or repeated (but may be skipped/omitted).
The trim operation removes surrounding space in images using top-left pixel color.
Example of trim operation (original on left, result on right)

Credit: Image by Mixkit
This changes the dimensions of the original image before Crop and Resize Process takes place. Allowing you to prepare the image before the algorithm is applied.
The AxB:CxD operation means manually crop the image at left-top point AxB and right-bottom point CxD.
The manual is very useful for applications that provide custom real-time cropping capabilities to their users.
The manual crop part of the url takes two points as arguments, separated by a colon. The first point is the left-top point of the cropping rectangle (A). The second point is the right-bottom point (B).
Coordinates can also be provided as float values between 0 and 1 (percentage of image dimensions)
This crop changes the dimensions of the original image before Crop and Resize Process takes place. Allowing you to prepare the image before the algorithm is applied.
The fit-in operation means that the generated image should not be auto-cropped and otherwise just fit in an
imaginary box specified by ExF.
This produces a letterbox effect, where the image is resized to fit within the specified dimensions, and any remaining space is filled with a solid color. This is very useful when you need to fit an image somewhere, but you have no idea about the original image dimensions.
Example of vertical fit in

Example of horizontal fit in

The stretch operation means resize the image to ExF without keeping its aspect ratios.
For large values this will result in a distorted image. This is useful when a little distortion is not important.
Example of stretch operation (original)

Example of stretch operation (result)

The -Ex-F operation means resize the image to be ExF of width per height size. The minus signs mean flip
horizontally and/or vertically.
This value is used by the other operations to determine the target size of the result image.
The GxH:IxJ operation adds left-top padding GxH and right-bottom padding IxJ. The color can be specified later
using the fill Image Filter.
The HALIGN operation controls where the cropping will occur if some width needs to be trimmed (unless focal point
detection is enabled). The default is center.
The possible values for this option are:
left: only trims the right side;center: trims half of the width from the left side and half from the right side;right: only trims the left side.
The VALIGN operation controls where the cropping will occur if some width needs to be trimmed (unless focal point
detection is enabled). The default is center.
The possible values for this option are:
top: only trims the bottom;middle: trims half of the height from the top and half from the bottom;bottom: only trims the top.
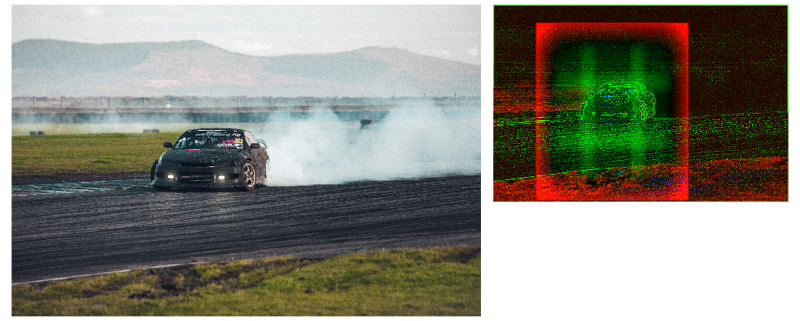
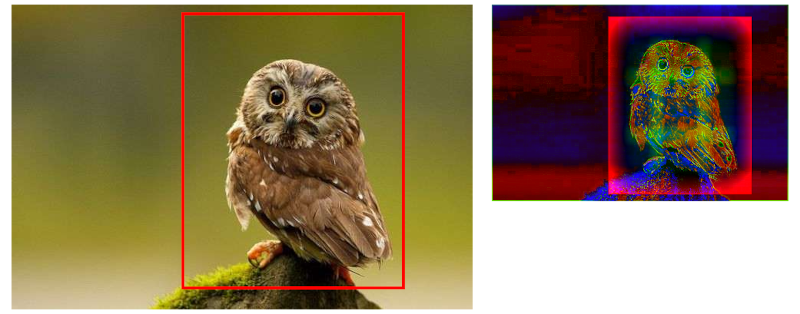
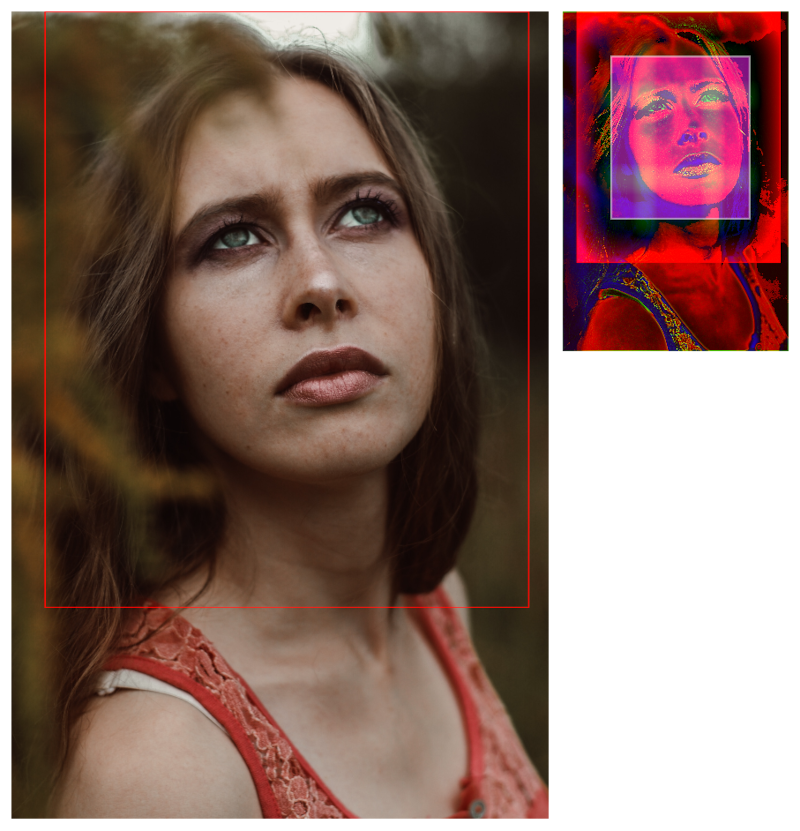
The smart operation means using smart detection of focal points.
The operation enables the algorithm which automatically determine which parts of the image are most interesting and sets the focal point accordingly. This is then used by the Crop and Resize Process to produce the final image.
Please note that although the algorithm is very good, it is not perfect and results will vary depending on the source image.
Example of smart focal points on an image of an Car
Example of smart focal points on an image of an Owl
Example of smart focal points on an image of a person
The following filters are available for use in the filters section of the configuration. Please see the above sections for descriptions of how to incorporate these filters into your configuration.
background_color(color)sets the background color of a transparent imagecolorthe color name or hexadecimal rgb expression without the “#” character
blur(sigma)applies gaussian blur to the imagebrightness(amount)increases or decreases the image brightnessamount-100 to 100, the amount in % to increase or decrease the image brightness
contrast(amount)increases or decreases the image contrastamount-100 to 100, the amount in % to increase or decrease the image contrast
fill(color)fill the missing area or transparent image with the specified color:color- color name or hexadecimal rgb expression without the “#” character- If color is "blur" - missing parts are filled with blurred original image
- If color is "auto" - the top left image pixel will be chosen as the filling color
- If color is "none" - the filling would become fully transparent
focal(AxB:CxD)orfocal(X,Y)adds a focal region or focal point for custom transformations:- Coordinated by a region of left-top point
AxBand right-bottom pointCxD, or a pointX,Y. - Also accepts float values between 0 and 1 that represents percentage of image dimensions.
- Coordinated by a region of left-top point
format(format)specifies the output format of the imageformataccepts jpeg, png, gif, webp, tiff, jp2
grayscale()changes the image to grayscalehue(angle)increases or decreases the image hueanglethe angle in degree to increase or decrease the hue rotation
label(text, x, y, size, color[, alpha[, font]])adds a text label to the image. It can be positioned inside the image with the alignment specified, color and transparency support:texttext label, also support url encoded text.xhorizontal position that the text label will be in:- Positive number indicate position from the left, negative number from the right.
- Number followed by a
pe.g. 20p means calculating the value from the image width as percentage left,right,centeralign left, right or centered respectively
yvertical position that the text label will be in:- Positive number indicate position from the top, negative number from the bottom.
- Number followed by a
pe.g. 20p means calculating the value from the image height as percentage top,bottom,centervertical align top, bottom or centered respectively
size- text label font sizecolor- color name or hexadecimal rgb expression without the “#” characteralpha- text label transparency, a number between 0 (fully opaque) and 100 (fully transparent).font- text label font type
max_bytes(amount)automatically degrades the quality of the image until the image is under the specifiedamountof bytesmax_frames(n)limit maximum number of animation framesnto be loadedorient(angle)rotates the image before resizing and cropping, according to the angle valueangleaccepts 0, 90, 180, 270
proportion(percentage)scales image to the proportion percentage of the image dimensionquality(amount)changes the overall quality of the image, does nothing for pngamount0 to 100, the quality level in %
rgb(r,g,b)amount of color in each of the rgb channels in %. Can range from -100 to 100rotate(angle)rotates the given image according to the angle valueangleaccepts 0, 90, 180, 270
round_corner(rx [, ry [, color]])adds rounded corners to the image with the specified color as backgroundrx,ryamount of pixel to use as radius. ry = rx if ry is not providedcolorthe color name or hexadecimal rgb expression without the “#” character
saturation(amount)increases or decreases the image saturationamount-100 to 100, the amount in % to increase or decrease the image saturation
sharpen(sigma)sharpens the imagestrip_exif()removes Exif metadata from the resulting imagestrip_icc()removes ICC profile information from the resulting imageupscale()upscale the image iffit-inis usedwatermark(image, x, y, alpha [, w_ratio [, h_ratio]])adds a watermark to the image. It can be positioned inside the image with the alpha channel specified and optionally resized based on the image size by specifying the ratioimagewatermark image URIxhorizontal position that the watermark will be in:- Positive number indicate position from the left, negative number from the right.
- Number followed by a
pe.g. 20p means calculating the value from the image width as percentage left,right,centerpositioned left, right or centered respectivelyrepeatthe watermark will be repeated horizontallyyvertical position that the watermark will be in:- Positive number indicate position from the top, negative number from the bottom.
- Number followed by a
pe.g. 20p means calculating the value from the image height as percentage top,bottom,centerpositioned top, bottom or centered respectivelyrepeatthe watermark will be repeated vertically
alphawatermark image transparency, a number between 0 (fully opaque) and 100 (fully transparent).w_ratiopercentage of the width of the image the watermark should fit-inh_ratiopercentage of the height of the image the watermark should fit-in
attachment(filename)returns attachment in theContent-Dispositionheader, and the browser will open a "Save as" dialog withfilename. Whenfilenamenot specified, the filename from the image source will be used
To prevent accidentally leaking sensitive information, errors details are hidden by default.
There are three ways errors are returned:
By default a generic "sad robot" error image is returned when an error occurs. This is accompanied by the appropriate HTTP status code to indicate the type of error which occurred, which allows you to handle the error correctly in your application.
If the "sad robot" image is not suitable for your use case, you can have plain text errors. This returns a generic plain text error message in the response body and does not contain any sensitive information. This does not require debug mode to be allowed.
This can be requested on a per-request basis by passing the query parameter plainerrors=true.
This can also be made the default behaviour by setting the plainerrors property in the
configuration to true.
Example:
plainerrors: true
This requires that debugging has be allowed via the configuration (see below).
For debugging purposes the full error message can be returned as JSON.
Passing the query parameter errors=true will trigger this error handling. Note that the
plainerrors=true query parameter will take precedence over this one.
If the Accept header only lists image types then the JSON is rendered as an image.
Otherwise the JSON is returned as JSON.
As this includes details about the error it should not be used be displayed to end users.
If you are having trouble with your image URLs, you can enable debug mode to get more information about what is happening behind the scenes. For security reasons, debug mode is not permitted by default, and must be allowed in the configuration.
To allow debug mode, add the property allowdebug to the configuration with the value of true.
Example:
allowdebug: true
After it has been enabled you may use the following query parameters:
nocache- When set totruethe response will not be cached by the CDN.debug- When set totruethe response will be a JSON object containing information about the request.errors- When set totrueany errors will be returned in the response body. By default errors are hidden and a generic error image is returned. See below for more details.
The following is a working configuration which serves as an example of the structure for a completed configuration file.
---

predefined:
  - path: "/xyz/" # Path prefix to match
    features:
      - "query-width-height-auto-ratio" # Replace default with auto when only one dimension is provided
      - "auto-webp" # Use WebP if the browser supports it
    operations:
      - "1280x720" # Size of canvas
      - "smart"
    filters:
      - "fill(000000)"
      - "watermark(https://www.cachefly.com/app/uploads/2021/05/CacheFly-logo_purple.svg,right,bottom,5,5)"
      - "label({{.width}}x{{.height}},20,20,40,white)" # Write the original image size as text
      - "format(jpeg)" # Use JPEG if the browser doesn't support WebP
    resize:
      size: "{{?WIDTH:800}}x{{?HEIGHT:0}}" # resize after filters based on query parameters
    image: "{{$SERVER}}images/{{$SIZE}}/{{$FILE}}"
    variables:
      SIZE: "medium" # Transform specific variable

variables:
  SERVER: "https://airportcod.es/" # Global variable

allowdebug: true # Allow use of ?errors=true and ?debug=true

plainerrors: true # Return plain text errors instead of the default "sad robot" image